I love chicken adobo. I mean, LOVE. That delicious combo of vinegar and soy sauce with all the garlic you could stand, drizzled over some white rice and some tender, fall off the bone chicken makes my mouth water and the scale climb in number. However, my husband loves it more than I do. He will almost do a happy dance when he finds out that he’s going to have chicken adobo, he loves the dish so much. It’s almost comical how happy he gets, but I’ll take it as a compliment to my cooking.
Chicken adobo is a Filipino dish that is very simple to make, yet extremely satisfying. Growing up, adobo meant something else other than the dish I enjoy fairly frequently today. Check out this Chowhound article on the difference between Latin and Filipino adobo.
The word adobo may come from the Spanish word adovar which means to marinate. So, basically, this recipe is all about the marinade. Typically, the chicken is stepped in this delicious, vinegary, and tangy marinade and then braised in the same marinade. The yield is a tender, delicious meat, falling off the bone. Typically, this dish is done at a low temp and cooked over hours.
It’s easy to make this Filipino-inspired chicken adobo in the slow cooker, but it’s quicker and just as fantastic in the Instant Pot. In fact, as much as I love this dish, I don’t love how the house smells when I make it in the slow cooker. It’s still fragrant in the Instant Pot, but not quite as in-your-face. And besides, you can cook this and have dinner served within an hour or less. Have nothing planned for dinner tonight? Chicken adobo to the rescue. You have an excess amount of chicken? Put it together in a Ziploc bag and freeze it for dinner in a pinch. Read on for the recipe!
Equipment List:
6-quart instant pot
Tongs to flip the chicken
Measuring cup and measuring spoons
Serving ladle (I used the one that came with my pot)
Plate to hold the reserved chicken (optional)
Wooden spoon to saute the chicken (optional)
Ingredient List:
2 pounds chicken thighs – bone-in and skin-on
1 cup white vinegar
1 cup low sodium soy sauce (or aminos if going gluten free)
6-8 garlic cloves
1 teaspoon to 2 tablespoons peppercorns
2 bay leaves
1 tablespoon of canola or vegetable oil for browning (optional)
The Cast of Characters for this recipe include: garlic, bay leaves, chicken thighs, soy sauce, and white vinegar, and peppercorns (not pictured). Six simple ingredients for a delicious dinner!
Recipe Instructions:
Optional step: wash and pat dry the chicken pieces.
Optional step: set the Instant Pot to “Saute” and adjust to medium heat. When the display states “HOT,” pour in and swirl around the oil. When the display reads “HOT” again, saute the chicken, skin side down, in batches. Brown the chicken for about two minutes and flip. Saute for two minutes. Set aside the chicken on a plate.
After browning. I personally found that the browning does not add too much additional depth of flavor to the finished dish, but I’ll let you be the judge of that.
Pour one cup of white vinegar together with one cup of low sodium soy sauce in the inner liner of the Instant Pot.
Peel and smash the garlic cloves, as many as you would like to have. Add to the vinegar/soy sauce mix.
Add peppercorns. They don’t make the dish spicy, but the peppercorns add a nice kick in each bite. You can omit them altogether, if you prefer.
Add the chicken.
Stir everything together. If you’re able to submerge the chicken, this is a good time to do that.
Add the bay leaves on top.
Ready for some pressure.
Cook under high pressure for about 10 minutes. If cooking from frozen, cook for 13 minutes.
Allow the pot to rest for about 10 minutes after the cooking cycle is complete.
Release any of the remaining pressure.
Option step: Press the “Keep Warm/Cancel” button. Remove the chicken from the pot and set aside on a clean plate. Tent with aluminum foil to retain the heat. Press the saute button on the pot and boil the liquid for a couple of minutes to thicken slightly.
Plated with Instant Pot Jasmine Rice. It was so delicious the next day, too!
What do you enjoy the most about this recipe? I think it’s the tanginess of the vinegar mixed in with the saltiness of the soy sauce. I also really like how tender this chicken becomes. It practically falls off the bone. Not to mention, the garlic takes on a smooth and slightly sweet taste, which is nice smeared over the chicken or on the rice. Delicious!
Thank you for sharing some of your screen time with me! If you liked this recipe, please hit the like button so I know to make more content like this. Tell me what you want me to try making next in the comments below. Also, check out my Facebook and Instagram (tag me at @cookwithsamib) for more photos and my Pinterest for what inspires me. Finally, don’t forget to subscribe to my blog for updates when I hang new posts!
Hamburgers are one of my favorite things to eat. When done right, they are juicy, flavorful, and all around awesome. I love a well-seasoned, perfectly cooked, juicy burger. My favorite burger joint is a place called Clarke’s CharBroiler, which has a ton of choices to make your perfect burger. I don’t go there often because it’s spendy, but it’s delicious. It’s also a fairly quick drive to and from the office.
My recipe for burgers from frozen works pretty well and can be increased, if needed.
I enjoy burgers so much, that I’m pretty sure both kids came out the womb craving ground beef patties. I largely ate burgers, pizza, ice cream, and hot dogs while pregnant. I tried to eat right, but the cravings were real. So I decided to enjoy myself and eat burgers. When else could I eat what I wanted (within reason)? I was totally eating for two. Yes, excuses, I know.
As my kids grew up to be somewhat picky eaters, we could agree that one thing they would probably always enjoy is a burger. But think about the expense of going to the golden arches to get an OK burger. The time, money, and gas it takes to pick up a Happy Meal for the littlest one and a “Quarter Pound” for the big one. Making sure that the burger is plain, which isn’t just without cheese. Not to say that McDonald’s doesn’t have a place in their lives – after all, it’s a thing I do with them when we go to see the doctor – but when I learned how to make an Instant Pot burger from frozen, the game changed dramatically.
First of all, I will mention this. I love my Instant Pot. I will do my best to figure out how to cook everything in it. I know it’s ultimately impossible, but you can’t blame a girl for trying, and I’m sure gonna try. This appliance has changed my cooking life and added confidence in the kitchen, something I never had before.
That being said, I was skeptical about pressure cooked burgers. Why not throw it on the grill or make it on stove? Well, for starters, I don’t mess much with the grill; sometimes I just don’t want to stand there flipping burgers. Secondly, cleaning up the splatter after cooking on the stove is just a pain. I don’t like my stove much because it’s electric and I prefer a gas range. I also don’t like how long it takes to cook frozen burgers on the stove. After all, I don’t have a whole lot of room to work with on the stove, so I inevitably do one burger at a time, which.takes.forever. Not conducive to a quick meal.
Then, I read a post on the Instant Pot Community Facebook page about cooking fresh burgers for 10-15 minutes in the Instant Pot. I was intrigued. So I decided to give it a try with frozen and see what I came up with.
I haven’t had a bad Instant Pot burger yet. My kids devour theirs nearly every time. My husband is a believer and suggests it as a quick meal.
In fact, last night, we were at a loss last night for quick dinner options. We looked at each other after a minute and said “burgers.”
We were eating within 35 minutes.
I think it’s safe to say that this recipe is a keeper. Read on for the recipe and let me know what you think!
Equipment List:
Instant Pot – I used my 6-quart. The size pot depends on how many burgers you want to make.
Trivet with legs – the one that came with my pot is perfect
Aluminum foil
Ingredient List:
Frozen burger patties – I used 1/4 pound burgers from Costco
Kosher salt
Ground black pepper
Garlic powder
Or, seasonings of your choice
Condiments, lettuce, tomato, buns (or lettuce wraps if you’re going no carb)
1 cup water for the inner pot
Cast of characters for tonight’s quick dinner. I think it took me longer to set up the photo than actually prep and make the meal!
Recipe Instructions:
Tear a piece of aluminum foil just over 12″ long. Place a frozen patty directly in the middle.
Season liberally and to your heart’s content.
Salt, pepper, and garlic all over my burger. Yummy!
Wrap each burger by loosely folding the foil over.
Add one cup of water to the inner lining of the Instant Pot.
Place trivet inside the pot.
Stack the foil-wrapped burgers on top of each other in the pot. This allows the burgers to retain as close to a circular shape as possible during the cooking process. *Note that the ones in the middle will be fully cooked, but slightly pink in the middle.
This is how frozen burgers wrapped in foil look stacked in the Instant Pot.
Lock the lid in place and set the steam release valve to sealing.
Press the manual/pressure cook/meat button and using the +/- buttons, adjust the time to 18 minutes. (If you stack and don’t want any pink, go with 20 minutes).
About five minutes before the cooking cycle is over, prepare your toppings and condiments.
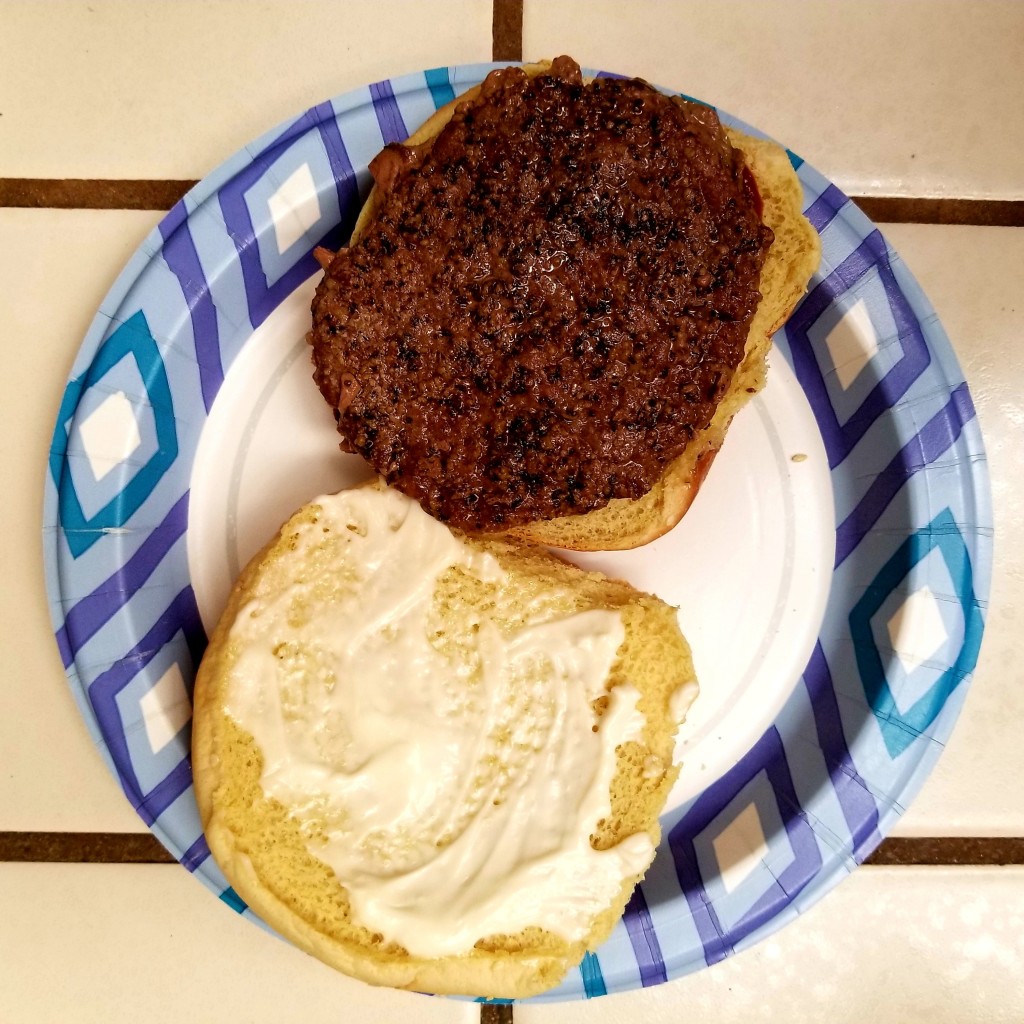
One of the burgers after the cooking cycle was over. Nice and juicy!
I decided to slather some mayonnaise on one of the burgers I made.
Assemble your burgers.
Enjoy!
An assembled dinner in less than 30 minutes.
How do you like your burgers? Let me know what sides you like with your burgers in the comments below!
Thank you for sharing some of your screen time with me! If you liked this recipe, please hit the like button so I know to make more content like this. Tell me what you want me to try making next in the comments below. Also, check out my Facebook and Instagram (tag me at @cookwithsamib) for more photos and my Pinterest for what inspires me. Finally, don’t forget to subscribe to my blog for updates when I hang new posts!
“Sam, the 1950s want their pot roast back” – my husband after eating my old-fashioned pot roast that I made in the Instant Pot.
It’s just that good. A warm, flavorful, comforting meal of beef chuck roast, potatoes, and sweet, buttery carrots with delicious gravy in every bite. I made this pot roast for the first time last year and my husband has raved about it ever since. I could tell that he liked it because he kept going up for more even though he was full.
Although pot roast was never a thing for me growing up, I associate it with Sunday afternoon dinners after church services. Several years ago, when visiting family in Phoenix, my mother-in-law made one for after worship supper that was delicious. The delicious and savory smell greeted us when we came home after socializing with the other congregants. It was a smell that makes me think of a warm and happy home. I wanted to do that for my family.
Despite my desire, I was never good at making pot roast in the oven, old-fashioned or not. I could never get it fall-apart tender and I didn’t have an hour per pound or the patience to spare to get the job done. I tried everything when making it in the oven, resulting in fail, after fail, after fail.
On a number of occasions I have done a great pot roast in the slow cooker, but that involves searing the meat on a separate pan on the stove, then transferring the contents to the slow cooker. In the morning. Before work. With two rambunctious, demanding-my-attention-all-the-time boys that I have to get ready and fed before school lest I want to have the meltdown to end all meltdowns from either or both of them. (Despite that description of them, I love them dearly and can’t picture my life without them.)
My slow cooker pot roast is nothing short of fantastic. I endeavored to convert it into an Instant Pot version, because, why not?
A good pot roast starts with chuck roast. A chuck roast is a cheap cut of meat that’s tough and stringy with all of that fat running through it. Because of this, a chuck roast only becomes tender from low and slow cooking temperatures and long cooking times. So the slow cooker is the only way to get it done, especially if I can’t hack it the oven. Right?
Right?
WRONG! The Instant Pot can get you a spoon tender, melt-in-your mouth result just as well – or better – than the traditional methods.
My pot roast recipe which fools people into thinking I spent three hours alone just cooking the thing. Maybe I’m the Hispanic June Cleaver, it’s so good.
Don’t let me sway you away from the slow cooker version of this dish. It certainly has its place. There is something about the smell of delicious meal welcoming you home after a long day’s work. I love that about my slow cooker. My Instant Pot will never replace my slow cooker. But my slow cooker does not do anything fast. It wasn’t build for that.
Now, before I jump in, I need you to be aware of something. In this exact form, this isn’t a weeknight friendly recipe. However, you employ a few shortcuts if you want to have this meal the same day.
For example, you could skip the sauteing of ingredients and just dump and go and be eating in about 1 1/2 hours. And that’s fine. BUT, meals like pot roast, chili, and beans are always better the next day because the flavors have had a chance to meld.
I made this recipe and had it the same evening and it was phenomenal. But the next day, my boss who cannot eat meat due to dietary concerns asked me where I got my lunch. This old-fashioned pot roast recipe upset the balance in the world.
Ever see Once Upon a Time in Mexico (AKA Desperado 2)? There’s this side story about Sheldon Sands, a CIA agent who eats the same pork dish at every Mexican restaurant he ends up at. In one particular scene, he meets with El Mariachi and remarks that the slow cooked pork he’s eating is the best he’s ever had. And because it’s the best he’s ever had, it upsets the balance in the world. In order to reset the balance, he has no choice but to kill the cook.
My pot roast upsets the balance in the world. It is the pot roast of pot roasts, the recipe to end all recipes of this sort. Try it and you won’t be disappointed. Just don’t shoot the chef after you eat it.
For my 1950’s Sunday Pot Roast, read the recipe below.
Equipment List:
6-quart Instant Pot
Cutting board
Chef’s knife
Measuring spoons
Measuring cup
Tongs
Ladle to scoop the deliciousness
Wooden spoon
Veggie chopper (optional)
Plate
Aluminum foil
Ingredient List:
3-4 pound chuck roast, cut into two even sized pieces
1 teaspoon dried rosemary
2 teaspoons garlic powder
2 teaspoons dried or ground oregano
2 teaspoons salt (cut down to 1 teaspoon if you’re sensitive to sodium)
2 teaspoons pepper
2 tablespoons of cooking oil (I used bacon grease)
2 cups of beef stock
2 teaspoons of fish sauce or Worcestershire sauce
1 yellow onion
3 ribs of celery
6 cloves of garlic
a few sprigs of fresh thyme (optional)
a few sprigs of fresh rosemary (optional)
baby carrots (your choice how much)
creamer potatoes (your choice how much)
4 tablespoons of salted butter, divided
Au jus seasoning packet (I used Lawry’s)
Dried parsley for garnish, if desired
Cast of characters for tonight’s recipe.
It’s a lot of ingredients. But they all work together to produce a delicious pot roast. Trust me when I say it’s all worth it.
Recipe Instructions:
Slice the onion into half-rounds. Set aside.
Using the veggie chopper or your chef’s knife, dice the celery and garlic. Set aside.
If using, wash and pat dry the rosemary and thyme sprigs. This is optional, but I have these herbs growing in my garden and I wanted to use them here.
Mix together your dried seasonings. Do not include the fresh rosemary and thyme here. Reserve those for later.
Place the potatoes and carrots on separate pieces of aluminum foil. Add salt and pepper to taste and drop in one tablespoon of butter in each. Wrap up the foil and set aside.
I did the same with the carrots. I also decided to season each in their own packets for added flavor.
Cut your roast into two or three uniform-sized pieces. You will want each piece to fit in the bottom of your inner liner.
Season each piece of meat with the dry seasonings. Don’t be stingy with the seasoning here. You should use it all up.
This is how your roast should look prior to searing. Feel free to add more seasoning if you want.
Push the Saute button and adjust the heat level to more. When the display reads “HOT,” put in the cooking fat and swirl it around the bottom of the pot.
After about a minute, brown the pieces of meat for about two to three minutes a side. Flip using tongs. Do not disturb the meat while it’s browning and make sure to not crowd the bottom of the pot.
While the meat is cooking, mix your wet ingredients in a 2-cup measuring cup.
This is the color you’re looking for on the roast. Those browned bits equal delicious flavor that will blow your mind.
Once the meat is seared, remove from the pot and set aside on a plate.
Meanwhile, pour in about a 1/4 cup of liquid mixture and the remaining butter and deglaze the bottom of the pot using your wooden spoon. Make sure to get as many of those browned bits up as possible since this will add depth of flavor to the finished dish and will prevent the pot from displaying a burn notice during the pressure cooking process.
Saute the onions for a few minutes, then add the celery and garlic. Saute the vegetables until they become translucent. Take care in this step to not burn the garlic.
Pour in the remaining liquid mixture and mix well. The browned bits will infuse with the liquid.
Place the roast back into the pot. If you cut it, be sure to nestle the pieces in evenly.
If using, place the rosemary and thyme on top. of the roast.
I know this is going to be goooooooooood eating!
Press the “Cancel/Keep Warm” button to stop the saute function.
Place the foil packets on top of the roast.
Now, you might be wondering, why put the veggies in now? It’s going to be a long cook time and they’ll turn to mush! True if potatoes and carrots are going straight in to the pot. But something about putting them above the rest of the ingredients and wrapped in foil keeps them from disintegrating. They certainly get cooked, but they don’t fall apart when you stick in a fork.
Almost there. I promise.
Seal and lock the lid. Place the pressure valve to sealing.
Press the manual or pressure cook button (I used the meat button. Note that there is no difference here) and using the +/- buttons, set the time to 60 minutes.
After the cooking cycle is over, let the pot naturally pressure release for about 15 minutes. Carefully release any remaining pressure by moving the pressure valve to venting.
Carefully remove the lid.
Remove the foil packets and set aside.
Remove and dispose the herb sprigs.
Remove the roast and set aside on a plate. The roast may fall apart at this point, so take care to not have hot liquid splashing on you!
Press the “Keep Warm/Cancel” button again.
Press the “Saute” button and adjust the heat to more.
Pour in the au jus seasoning and stir with a wooden spoon to incorporate. Allow the mixture to bubble for a couple of minutes to thicken to the desired consistency.
Slice meat.
Serve with the thickened sauce, potatoes, and carrots.
Enjoy!
Look at it. Just look at it. It needed a hunk of bread!
Bread hack: wrap in plastic and freeze your bread in medium sized hunks so you can heat up when the mood strikes! Warm in a 400 degree oven for about 10 minutes and slice to desired sized pieces. Crusty bread is great for sopping up that delicious sauce!
Let me know how you like your pot roast and when you usually have it. There isn’t one “right” way. I usually know it’s a hit when my husband goes for a second serving on a full stomach! I hope you enjoyed this recipe as much as we did!
Thank you for sharing some of your screen time with me! If you liked this recipe, please hit the like button so I know to make more content like this. Tell me what you want me to try making next in the comments below. Also, check out my Facebook and Instagram (tag me at @cookwithsamib) for more photos and my Pinterest for what inspires me. Finally, don’t forget to subscribe to my blog for updates when I hang new posts!
Disclaimer: This post uses Amazon affiliate links. If you use my link and purchase the item, I get a small commission (and it doesn’t cost you anything).
I love my Instant Pot. Mine is a 6 quart 7-in-1 multicooker that can saute, pressure cook, make yogurt, steam, cook eggs, among other things. I’ve had since 2016 when we bought our house and since then we bought a 3 quart and adopted another 6 quart. I love having multiple pots since I can cook so many things at once for meal prep or potlucks. If you haven’t purchased one, you should consider it!
New Orleans has a special place in my heart. I’ve been there twice with my husband: once around Saint Patrick’s Day (when he proposed) and then the following year during the summer. NOLA is a place full of soul, cobblestone-lined streets, parties, raucous visitors, and the sound of music spilling out of every bar.
NOLA is a place full of magic. There were so many wonderful shops to walk through. There was a store solely dedicated to Christmas decorations and several others that sold only masks.
Exhibit A: There is legitimately a store called “Santa’s Quarters” on Decatur Street that sells Christmas stuff. All. Year. Round.
Exhibit B: Mask Factory, one of many shops in town dedicated to masks.
Exhibit C: I became a snow leopard that day…
A favorite memory – aside from getting engaged after the Saint Patrick’s Day parade – is of us wandering Bourbon Street late into the evening after a nap and dinner. I don’t remember where we were going or why, but I recall the NOPD mounted police trotting along. Once we got to one end of Bourbon Street at the corner of Canal behind Walgreens and across from Krystal, a band took up their instruments and started to play. They were jamming out beautiful jazz music and a crowd formed to watch. NOPD mounted police took up a stance at the intersection of Bourbon and Canal to detour traffic. It was amazing. I remember dancing along and laughing, wishing that we never had to leave.
I also love NOLA for its food. The food has African, Latino, French, Spanish, and Haitian (among other) influences. You can see these influences in delicious dishes like etoufee, jambalaya, dirty rice, and gumbo.
One of my favorite New Orleans dishes is red beans and rice. Growing up, I ate my parents’ pinto beans and rice with meat, chicken, or fish, which was delicious. This is a New Orleans-inspired version which is spicier and includes meat cooked at the same time as the beans. I’ll post a Dominican beans recipe for those who still want savory beans but not the spicy. (Of course, you could always adjust the spice level in this recipe to suit your tastes.) For the New Orleans-inspired version, read below!
Today’s cast of characters photo only features the spices I used for this recipe. I find that these are the non-negotiables for my take on red beans.
Please note that my recipe ISN’T exactly dump and go. It can be if you put dried beans straight in to pressure cook with the rest of the ingredients, but I find the texture and overall flavor to be much better with pre-soaked beans. There are plenty of articles of you Google “should I soak my beans” that give you opinions either way. What’s more important is the receiving audience of your food creation. So, ultimately, you do you.
Soaking is easy. I pour a pound of dried beans into a medium bowl and add water until the beans are covered by at least a 1/2 inch. Then, I walk away for 8-10 hours. Afterwards, I drain the beans in a mesh sieve and set aside for the cooking process.
Equipment List
Instant pot. I used my 6 quart Duo 7-in-1.
Medium sized bowl.
Wooden spoon.
Chefs knife.
Vegetable chopper.
Cutting board.
Slotted spoon.
Measuring spoons and cups.
Ladle for serving.
Ingredient List
1 pound of dried (or soaked and drained) kidney or small red beans.
1/2 to 1 pound of andouille sausage.* (See tips below)
2 tablespoons vegetable oil.
3 cups of chicken or vegetable stock.
2 cups of water.
3 stalks celery.
1 green bell pepper.
3 cloves (or more) of garlic.
1 medium white or yellow onion.
Black pepper to taste.*
Creole seasoning blend (I used Tony Chachere’s) to taste.*
Cayenne pepper to taste.*
2 teaspoons dried oregano.
1 tablespoon smoked paprika.
Tip #1: You can use any sausage you like. Traditionally, this is made with the bone and bits of a ham hock from the previous evening’s meal. That imparts smokiness to the dish. You can also omit the meat entirely for a vegetarian-friendly version. If that’s what you are looking for, then swap the chicken stock for veggie stock.
Tip #2: The black pepper, Tony Chachere’s, and cayenne pepper amounts are all up to you. Want a mild heat? Go for 1/2 teaspoon each. Want to kick it up a notch Emeril-style, then “Bam!” your way to go spice heaven with a 1/2 a tablespoon or adjust as you go. Remember that you can always add more but not take away.
Tip #3: I did not add salt to this recipe because Tony Chachere’s contains salt.
Recipe Instructions
Chop celery, onion, and garlic.
Slice, remove the seeds, and chop the green bell pepper. (Note: I recommend you chop the veggies into uniform-sized pieces.)
Cut your sausage into even sized medallions.
Turn on your pot to sauté and “more” to increase the cooking temp quickly.
When the displays “HOT” put in 2 tablespoons of oil.
Sauté sausage for a few minutes until browned on both sides.
Remove the sausage.
Sweat the vegetables in the pot until they are translucent. Use the wooden spoon to scrape up the brown bits and deglaze the bottom of the pot. The veggies will release their liquid and make it easier to do this.
Add back the cooked sausage and their juices.
Add the beans.
Add the chicken stock and water to cover the mixture by about 1/2 to 1 inch.
Season the mixture with the spices and mix. Taste the broth and adjust the seasonings close to your preference.
Close the lid and lock it in. Set the valve to sealing.
Select the manual or pressure cook button and use the +/- buttons to set the cook time to 40 minutes.
When the cooking cycle is complete, let the pot naturally release pressure for about 20 minutes. (The display will read “L 00:20.”)
Quick release the remaining pressure and carefully open the pot.
Stir the red beans, taste, and adjust seasoning (if needed).
Remove about a 1/4 cup of beans and liquid and place into a bowl. Using the back of a spoon or the bottom of a ladle, mash the beans. Add the mashed beans back to the pot and mix to incorporate.
If you want the red beans thicker, mash more beans and add them back in. Keep in mind that this will thicken up slightly anyway.
Serve with hot rice and a scatter of green onion.
You can dot it with hot sauce (Krystal) if you want some additional heat.
The result after mixing in some mashed red beans to naturally thicken this up. Plated with some Instant Pot Jasmine rice and a scattering of green onion from my backyard garden. Yum!
If you enjoyed this recipe, please give it a like and let me know in the comments below how you like your oatmeal. Share this with your friends and subscribe to this blog!
Disclaimer: This post uses Amazon affiliate links. If you use my link and purchase the item, I get a small commission (and it doesn’t cost you anything).
I love my Instant Pot. Mine is a 6 quart 7-in-1 multicooker that can saute, pressure cook, make yogurt, steam, cook eggs, among other things. I’ve had since 2016 when we bought our house and since then we bought a 3 quart and adopted another 6 quart. I love having multiple pots since I can cook so many things at once for meal prep or potlucks. If you haven’t purchased one, you should consider it!
There’s an Ikea just up the freeway from us. We don’t go often because it’s really an all-day thing. I once went on a lunch break to return an item and ended up staying there for almost 2 hours! On the days that we go, it’s just so hard look at some of the things. We have to look at all of the things!
There’s also the cafe. The wonderful delicious food at the cafe. If you’re an Ikea Family Member, you can get a mug of coffee for free and you can enjoy some lunch at the cafeteria which is conveniently placed on the second floor of the store where we live. I suppose they worked out that shoppers need energy to keep shopping, hence the cafeteria. Those sneaky Swedes!
One of my favorite things to eat as the Ikea cafeteria is Swedish meatballs with lingonberry sauce. So delicious! I can almost taste the flavorful sauce with the tender meatballs and the light sweetness of the lingonberry. You ever have that one thing that you just enjoy eating so much? That’s the Swedish meatballs at Ikea for me!
Also, I recently had some Swedish meatballs at a congregational meeting last month. I enjoy congregational meetings because we all get together to share some good food and talk church business. One of the ladies prepared Swedish meatballs and they were so delicious! The boys actually enjoyed a few pieces themselves, the picky eaters they are. Ever since that Sunday, I couldn’t get that meal out of my head. I needed to make some for myself!
This instant pot recipe for Swedish-Inspired meatballs is my take on the iconic dish. Lingonberry sauce is hard to find where I live, so I substitute cranberry sauce in its place. You’ll find that this recipe does meet the mark if you’re in the mood for some Swedish food, but not wanting to go to Ikea and not living in Sweden already. I hope you enjoy this recipe as much as I do.
Today’s cast of characters. Not pictured: salt and pepper and cranberry sauce.
The Dijon mustard was being a bit saucy for the group photo, LOL!
Equipment list:
6 quart Instant Pot
Measuring cups
Measuring spoons
Wooden spoon
Whisk
Small bowl
Soup ladle (the one that came with your Instant Pot works perfectly for serving)
Ingredients list:
2 cups chicken broth
1 package of your favorite meatballs* (check out the tip below)
2 teaspoons low sodium soy sauce (I only had the fully leaded version)
1/3 cup butter
1 teaspoon Dijon mustard
Garlic powder, salt, and pepper to taste
1 cup heavy cream*
1/4 cup all-purpose flour*
*Tip: If you want or need to make this recipe gluten free, replace the all-purpose flour with arrowroot flour and read the packaging on your meatballs! We don’t have an issue with gluten, except for the fact that we love it so much (bread, cookies, pizza…), so I don’t mind that the Safeway Kitchens brand that I used has gluten. I also have no issue with using flour as the thickener.
*Tip #2: Always add major dairy products (milk, cheese, heavy cream, sour cream, etc.) in after the cooking cycle is done. Pressure cooking dairy makes it curdle and not as appealing at all. You’re better served mixing it in at the end.
Recipe instructions:
Turn on the pot to saute and adjust to less by pressing “saute” and pressing the “adjust” button.
Pour the chicken broth into the inner liner of your Instant Pot.
Mix in Dijon, soy sauce, and garlic/salt/pepper to taste.
Add desired amount of meatballs (I did about 20 ounces which was 20 meatballs).
Close and lock the lid and set the valve to sealing.
Select the “manual” or “pressure cook” button and using the +/- buttons, set the cook time to 5 minutes.
Once the cooking cycle is over, let the pot naturally release pressure for 10 minutes, then release the remaining pressure but moving the sealing knob to venting.
Press the “keep warm/cancel” button and go back to saute mode. It should stay on the “less” setting.
Carefully pour in the heavy cream and stir with the wooden spoon.
Scoop out about one cup of the broth into a snack bowl and quickly whisk in the flour.
Add the flour slurry to the pot, quickly stirring with the wooden spoon. Saute until thickened to your preference.
Serve!
I had mine over rice with some canned cranberry sauce. Pretty tasty.
Should’ve added some parsley, but I’m a home chef, so… 💁🏾♀️
Nutrition Information:
675 calories, 16 grams protein, 63 grams carbohydrates, 40 grams of fat. 1 serving is five meatballs with about a half cup of sauce. Tasty, but not for every dinner!
Let me know what you like to eat Swedish meatballs with or if you have any variations I should consider. If you have any suggestions for other meatball recipes you want me to try on the Instant Pot, let me know in the comments below. And if you like this recipe, hit the like and subscribe so you keep up to date with what I post. Share with your friends, too!


You must be logged in to post a comment.